*As an Amazon Associate I earn from qualifying purchases.
There are 2 general ways to measure water depths without a boat. First, you can do so manually, or you can use a castable fish finder. The 2 most effective manual options are a marker float setup, or a slip bobber rig. Alternatively, you could use a castable electronic device which interfaces with your smart phone, such as the Deeper Start Smart Fish Finder![]() .
.
Let’s discuss these options below.
1. Use A Marker Float To Determine Water Depth From The Bank
A marker float, or “marker dart”, is an aerodynamic dart-like float designed specifically for the task of measuring water depths. With that said, you don’t actually need a “marker dart” to accomplish this task. That’s money you don’t necessarily have to spend. Instead, any sizeable float that has an eyelet on one end, where you can tie your line, will work fine. More about different float options below.
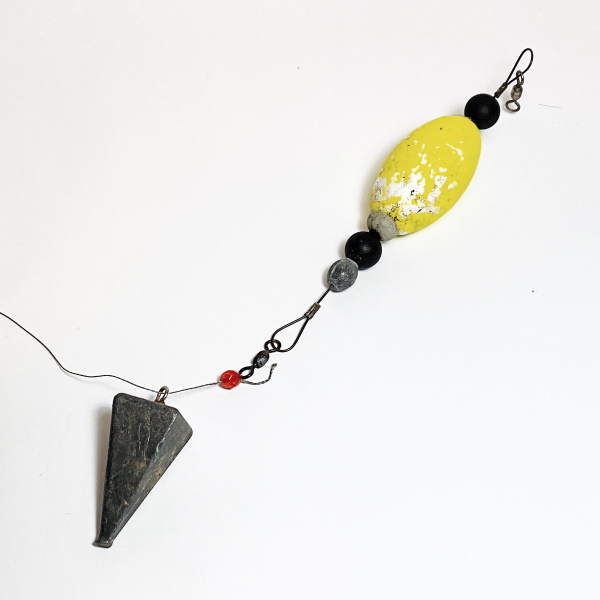
To use the marker float method to determine water depths you’ll need a rod and reel, a heavy lead sinker, and something to serve as your “marker float”.
Components Of A Marker Float Setup
- Rod & Reel
- Float
- Heavy Sinker
- Sinker Slide (optional)
- Plastic Bead (optional)
The Float
They sell special “marker floats” for this purpose, but all you really need is a large brightly colored bobber that has an eyelet to tie your line to. Popping corks, for example, have eyelets on each end, so they’re what I like to use. Another good option is an empty crushed water bottle with the cap screwed on tight. You can tie your line around the mouth of the bottle.
The Sinker
For the lead, I like to use my surf fishing pyramid sinkers since they dig nicely into the bottom. You need enough weight so that it doesn’t drag towards you when you’re attempting to reel the float to the bottom.
Sinker Slide
Sinker slides are an optional part of the setup. Instead of using a sinker slide, you can simply slide your sinker onto your main line. The eyelet of the sinker alone, should slide up and down the line just fine. If you exclude a sinker slide from your setup, it’s best to include a plastic bead so that the sinker doesn’t get hung up on your knot.
A Bead
A plastic bead is optional, but I find that it is helpful to keep things sliding smoothly without getting hung up.
How To Assemble A Marker Float.
- Slide a heavy lead onto your mainline – I prefer pyramid sinkers
- The lead must be heavy enough to hold the float on the bottom
- Slide a plastic bead on after your lead
- Finally, tie a float to the end of your line
Below is my really crude drawing of how a marker float works

How To Use A Marker Float
Once you have assembled your marker float, below are the steps of how to use it.
- Cast the float and bobber out, and allow the weight to sink to the bottom, keeping your line tight as it sinks.
- Slowly reel your line tight to the sinker without dragging the sinker on the bottom. Reel the float all the way down to the sinker.
- Once you have the float tight to the sinker on the bottom, slowly feed line off of your reel until you see the float on the surface. The line distance that you had to feed off your reel before seeing the float is the depth of the water at the sinker.
- Besides determining water depth with marker floats, you also get a feel for the bottom composition as you reel the heavy lead back in. Using braided line with this setup will also give you an even better feel for the bottom composition.
Check out my short YouTube video below showing the marker float setup in action.
2. Throwing Sticks To Determine Water Depth
I’m kidding a bit here, but this is literally how I’ve determined water depth many times over the years. Typically I only use the crude stick throwing method when determining if I should try to cross a body of water with my atv or by foot.
Take a heavy straight stick and toss it in a manner where it will enter the water vertically. Very imprecise and difficult to master, this is obviously a last resort. If you want to fish the spot, you’ll have to wait some time for fish to return after you throw a bunch of logs into the water.
3. Using A Slip Float Rig
Another manual method I use often is a simple slip float rig. In fact, I commonly use this method even when I’m in a boat.
A slip float allows you to move your bobber up and down your line as you repeatedly cast out. If the bobber stands upright, that means the water depth is greater than where your float is positioned on your line. If the bobber lays over sideways in the water, that means the water is shallower than where you float is positioned. You can adjust the float up and down until you determine the actual depth.
I often use a slip float rig with a jig at the bottom when crappie fishing. With this setup, you can probe an area very quickly to find the water depths you desire. You’ll need to use a bobber style that is designed to lie horizontally when not under tension. You want it to stand up vertically when the weight is pulling it down.
Let’s say you know that crappie, or some other fish, are spawning in a particular water depth. You can set your slip float to the minimum depth you wish to fish. If the bobber lays over on it’s side, you know to skip that section of water as it is too shallow.
Below is a short video on how to tie a slip float rig. Simply substitute the jig for a lead sinker if so desired.
4. Check Depths With A Castable Fish Finder

* Click image above to view prices on Amazon
Castable fish finders are really nice additions to your bank fishing arsenal, and they are actually pretty affordable these days (2020). There are several brands of castable fish finders on the market, but the “Deeper” brand, linked above, seems to be the best available, with the ReelSonar iBobber coming in as an acceptable alternative.
How A Castable Fish Finder Works
You’ll use an app on your phone to remotely communicate with the electronic “bobber” using bluetooth. Sync the device to your phone, then open the app. Cast your electronic bobber out and voila! – you have a nifty depth finder that you can use from the bank.
What A Castable Fish Finder Shows You
Besides water depths, a castable fish finder pretty much shows you all the same sorts of things that a normal fish finder would. Water temps, presence of fish, structure, bottom contour and bottom composition are all shown on your phones app.
Conclusion
For certain bodies of water, you may have a decent lake depth map available. If that’s an option for you, a map is always the best place to start. A good lake map at least gets you in the right area. Regardless, you’ll still want to use one of the methods above to hone in on the best spot within a spot, which can make all the difference in the world.
Good Luck!
Augustus Clay
If you enjoyed this article, you might also like my article about Why To Crush The Barbs On Hooks.